Monday, January 31, 2011

My Favorite Healthy Change (Eat. Live. Be. WEEK 5)

The best thing I've done for my health this year is to stop looking at price tags on produce. Winter produce is more expensive and less exciting. You pay more and you get less. But this year, I decided to buy the best and funnest produce I can find. Ten pounds of fruits and vegetables - no matter how pricey - still costs a lot less than ten pounds of meat or fish. Plus it's better for me. 

Here are some of my recent splurges. 


 Broccoli, for Oven Roasted Broccoli with Lemon and Parmesan.


Baby bok choy, for sauteed veggies with tofu (haven't had a chance to post that one yet). 

Fresh beans, for Simple Cranberry Beans.


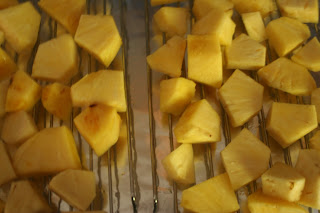
Pineapples, for Green Salad with Oven Dried Pineapples.

 Chard, for Simple Sauteed Swiss Chard.

And lot of Meyer lemons, for anything that calls for lemon juice or zest.

What changes have you made to improve your health this year? 


Here's a list of other bloggers participating in the Eat. Live. Be. ChallengeSarah, Cate, Maris, Chris, Faith, Kristen, Emily, Jenna, Joanne, Casey, Patsy, Tri-Fit Mom, Claire, Allison, Jen and Leslie.

Sunday, January 30, 2011

Roasted Broccoli


I hate covering up my gas grill at the beginning of the winter. It means many months without grilled chicken, fish, and meat. Months without freshly grilled vegetables and breads.

But there is one winter food that comes close: roasted vegetables. I have learned that you can roast most anything. String beans. Potatoes (white and sweet). Peppers and tomatoes. Butternut squash, carrots, and parsnips. Onions, garlic, and zucchini.  


Today I tried roasting broccoli for the very first time. I came across this recipe on The Amateur Gourmet. In a word - wow. Forget about the steamed or sauteed stuff. I will never prepare broccoli any other way. As the Amateur Gourmet put it, this is The Best Broccoli of Your Life. Really.


Roasted Broccoli
The key to success with this recipe is to make sure the broccoli is in a single layer. Otherwise it'll steam instead of roasting. 

1 head broccoli
4 cloves garlic, cut in half lengthwise
3 tablespoons olive oil, divided
salt and pepper to taste
zest and juice of 1/4 lemon
2 tablespoons Parmesan cheese

Preheat the oven to 400*.

Clean the broccoli and dry it very thoroughly. Cut it into large, even florets.On a large baking sheet, toss the broccoli and garlic with 2 tablespoons of olive oil, salt and pepper. Spread it evenly over the baking sheet in a single layer.

Roast for 20-25 minutes, giving the pan an occasional shake to be sure the vegetables are browning evenly.

When the edges are beginning to brown, remove the vegetables from the oven. Place in a serving dish and add the remaining tablespoon of olive oil, lemon juice and zest, and Parmesan cheese.

Serve warm or at room temperature.


Saturday, January 29, 2011

Soy Glazed Butternut Squash


I hope you won't think less of me when I tell you that until this winter, Butternut Squash was featured very rarely on my menus. I find it annoyingly difficult to deal with.

The shape is odd and bulgy.


The seeds are stringy and uncooperative.


And, worst of all, it's hard, VERY thick, and nearly impossible to cut up without cutting off a body part, or at least part of a body part. (Trust me on this. I have tried many times and the results have almost never been good.)


But this winter, I found prepped butternut squash at my local Costco. Here's how it works. You toss a package into your cart. You rip open the seal, pry off the cover, and use it in any dish that calls for the stuff. Wow. Talk about simplicity. Now I can make dishes that call for butternut squash without putting my life and sanity on the line. It's a wonderful world.

One of my favorite iPad apps - Mark Bittman's How to Cook Everything!

Soy Glazed Butternut Squash from How to Cook Everything, by Mark Bittman
2 tablespoons oil
3 cloves minced garlic
1 teaspoon grated ginger
1 1/2 pounds butternut squash, peeled and cut in cubes
2 tablespoons soy sauce
2 tablespoons water
Sliced scallions for garnish

Put the oil, garlic, and ginger in a large deep skillet over medium heat. When the garlic begins to color, after about 2 minutes, add the squash, water, and soy sauce. Bring to a boil, cover, and turn the heat down to low. Cook, stirring once or twice, until the squash is tender (15-25 minutes, depending on the size of your cubes). 

Uncover the pan and turn the heat up to medium-high. Cook, shaking the pan occasionally, until all the liquid is evaporated and the squash has begun to brown, 5-10 minutes. Turn the heat to low and cook till the squash is as browned and crisp as you like. 

Garnish with scallions and serve.  


Monday, January 24, 2011

Celery Root and Mushroom Soup


Some vegetables make for pretty photos. A red and green head of Rainbow Chard. A neat row of colorful bell peppers, evenly sliced and lined up like soldiers.

Celery root does not.
But it made for a really nice soup last week. I made a big pot on Sunday and it lasted for three dinners over the course of the week. Adults and kids alike enjoyed it!


Celery Root and Mushroom Soup, from Eating Local
The recipe calls for stock, but I didn't have any on hand (and I didn't have time to make any), so I used water. I also substituted onions for the leeks and yogurt for the sour cream. The soup tasted great!


2 tablespoons butter or oil
1 cup thinly sliced leeks (white and pale green parts only)
1/2 pound celery root, peeled and cut into 3/4 inch dice
1/2 pound white mushrooms, quartered
1/2 pound potatoes, peeled and cut into 3/4 inch dice
6 thyme sprigs
4 cups chicken or vegetable broth
salt and black pepper
Optional garnishes: creme fraiche, sour cream, minced parsley or chives

Melt the butter over moderate heat. Add the leeks and saute until soft, about four minutes. Add the celery root, mushrooms, potatoes, thyme, and broth, and bring to a simmer. Cover and adjust the heat to maintain a simmer. Cook until the vegetables are tender, about 20 minutes.

Remove the thyme sprigs. Let cook slightly, then puree the soup in a blender or food processor until smooth. Return the soup to the pot and reheat to serve. Season with salt and pepper.

Divide in bowls and add desired garnishes.

My Healthy Eating Challenges (Eat. Live. Be. WEEK 4)

If I do say so myself, I'm doing pretty well on my goals for the new year.

  • I'm eating what I enjoy. This one's never a challenge for me.  ;>)
  • I am enjoying what I eat. I savor every bite of every meal and snack. 
  • I am loading up on as many fruits and veggies as I want and trying to eat as much seasonal produce as possible. 
  • And last, I'm eating VERY little of everything other than produce. 


The thing that gets most in the way of my goals is making time to shop and cook healthy when I'm busy (which is always). It's so much easier to cook up some macaroni for lunch than it is to clean and chop a head of chard. It's faster to make a grilled cheese sandwich for dinner when I get home late and tired than it is to chop up a salad and broil some fish. 

The fact that I enjoy cooking and working with food helps. Healthy eating will never be the fastest, easiest option. But it's a lot more fun. I let myself enjoy the process of cooking instead of seeing it as a chore. What are your challenges and how do you tackle them?


Here's a list of other bloggers participating in the Eat. Live. Be. ChallengeSarah, Cate, Maris, Chris, Faith, Kristen, Emily, Jenna, Joanne, Casey, Patsy, Tri-Fit Mom, Claire, Allison, Jen and Leslie.

Sunday, January 23, 2011

Chai Tea (Guest Post)

Today, I'm delighted to be a guest on Cooking Outside the Box.

It's rare in the life of a full time working mother of four. But it happens every once in a while. The older kids head off to school or to friends, the baby goes in for a nap, and I find myself with a half hour of quiet time on my hands. Time to read the paper. Time to take out my crocheting. Time to call a friend. Time just for me.

It’s at times like this, so few and far between, that I reach into the spice cabinet for the cardamom, fennel seeds and star anise. Because there’s nothing like a cup of fresh homemade chai tea to complete the feeling of relaxation and luxury.

Star anise

Cardamom

Fennel seeds

Black peppercorns

Saturday, January 22, 2011

Fennel Orange Salad


Now, I can relax. I've used up the last of my fennel.


Last week, I bought WAY too much fennel, simply because it was on sale and seemed like a good way to add interest to my week. Since I'd never prepared fennel before, it ended up creating quite a bit of anxiety for me.

I did pretty well, if I do say so myself, with a Cauliflower Fennel Soup inspired by a recipe in  Eating Local by Janet Fletcher. But I still had three heads left.

It was Very Stressful.


By Wednesday of last week, they were quite ready for use. By Thursday they were looking a little sad. And by Friday, I knew that time was of the essence. I needed to act quickly or risk losing them.

So I was delighted when a friend (thanks, Ayala!) shared an Orange Fennel Salad recipe from the Food Network, and when I come across a similar recipe on Shutterbean, a lovely food blog with beautiful photos. The original recipes called for lots of fennel (check), oranges (check) and arugula (uh-oh). I left out the arugula, which isn't a favorite ingredient of mine anyway, and also changed the wine vinegar to cider vinegar. It was terrific. A new favorite. And the best part is that I've used up all the fennel in the fridge! On to new exotic ingredients....


Fennel Orange Salad, based on a recipe from Shutterbean

2 oranges
3 medium bulbs fennel, thinly sliced
3 tablespoons olive oil
1 tablespoon fresh squeezed orange juice (you can squeeze the juice from the bits left after segmenting)
1 tablespoon apple cider vinegar
1 teaspoon brown sugar or honey (more or less depending on your taste)
salt and pepper to taste

Cut the ends off of each orange. Place the fruit cut end down and cut away the peel by following the orange's shape. Then, use a sharp knife to cut each orange into about segments. 

Place the sliced fennel and half the orange segments in a large salad bowl. In a smaller bowl or cup, mix the olive oil with the orange juice, vinegar, brown sugar, and salt & pepper. Pour dressing over the fennels and oranges and toss well. 

Put the salad onto a plate and decorate with the remaining oranges. Serve immediately. 


Thursday, January 20, 2011

Whole Grain Fruit Crisp


I love fruit crisps and make one almost every weekend. (Don’t tell anyone, but we eat crisp as a side dish instead of as dessert.) I have a tried and true formula for a wonderful, EASY crisp which you can make with just about ANY fruit.


Today, I set out to make a whole wheat, sugar-free version for a diabetic family member. I refuse to bring artificial sweeteners into my kitchen (I’d rather eat sugar), but I do have lots of agave nectar. It was just the thing. The crisp turned out really tasty. The topping is nutty and nicely flavored. It doesn't have the same crunchiness of my usual fruit crisp, but it's a great sugar-free option. 


For this crisp, I used two pears, two apples (one green and one red), and about a cup of frozen blueberries. But you can use lots of different combinations. Some of my favorites:
  •  pears, apples, and cranberries
  • peaches, nectarines, and blueberries
  • apples (granny smith or any other firm favorites)
  • apples and pears
  • strawberries, blueberries, and apples
  • plums and apples
  • peaches, apples, and cherries


Whole Grain Fruit Crisp
The agave nectar in the topping makes it less crumbly and more like a cookie batter. Crumble it as best you can over the fruit.

For the fruit:
about 6 cups of your favorite fruit, pitted, peeled and sliced as necessary
2 tablespoons whole wheat pastry flour
juice of one lemon
1 tablespoon agave nectar

For the topping:
1 stick margarine
1 cup agave nectar
3/4 cup oatmeal
1/4 cup whole wheat pastry flour
3/4 cup pecans, broken into small pieces

Preheat the oven to 350*.

Combine the fruit ingredients in a Pyrex pie plate. Mix well. (Here's my favorite on Amazon.)

Combine the topping ingredients in a mixing bowl with your fingers till well mixed.  It will be less crumbly than a traditional crisp topping. Scatter the topping in bits over the fruit.

Bake for about an hour, till the top is beginning to brown.

Serve warm or refrigerate for up to three days. If you are refrigerating it, bring it back to room temperature before serving.  


Wednesday, January 19, 2011

Cauliflower Fennel Soup


I don’t know what I was thinking. I have never cooked with fennel before. I have eaten it maybe five times in my life and am completely clueless about how to use it and what to combine it with.

Why, oh why did I buy six heads of it? Maybe it’s because they were really cheap - $3 for the whole lot – or maybe it’s because they looked fresh and crispy. There was something exotic looking about them that I thought would add interest to my week. But whatever the reason for my impulse purchase, when I looked in the fridge this morning and realized I had to use them before they started wilting, I was none too pleased.


I asked my Twitter followers for some help, but not a one responded. (Click here to follow me!)

I checked several cookbooks and blogs but couldn’t find anything appealing.


Then I chanced upon a recipe for a Cauliflower Fennel Soup in Eating Local by Janet Fletcher. I made a soup based very loosely on this one, and it was fantastic! I took quite a few liberties – adding star anise and fennel seeds to the stock, along with LOTS of garlic to the sauté. Wow. The flavors were mild but so unusual. The soup was creamy, rich and packed with taste. Definitely a keeper.


Cauliflower Fennel Soup (based very loosely on a recipe from Eating Local by Janet Fletcher)
I hardly ever make stock for soups, but I thought this one would need the extra flavor. I highly recommend you take the extra step of making a stock, and that's how I've written the recipe. If you're rushed, try it with water instead. (Be sure to let me know how it turns out!)

For the Soup: 
1 tablespoon canola oil
4 medium onions, sliced in rings
3 heads of fennel (white part only), sliced in rings
4 cloves of garlic, chopped
1 teaspoon salt
a dash of black pepper
12 ounces frozen cauliflower

For the stock:
1 carrot, scrubbed and chopped in a few coarse pieces
1 stalk of celery, cut in four
1 potato, scrubbed and cut in large chunks
1 onion, left unpeeled, cut in large chunks
1 head of garlic, left unpeeled
1 teaspoon fennel seeds
1 piece of star anise

For the soup, heat the oil in large pot. Add the onions and fennel and sauté over medium-low heat, stirring from time to time, for about 30-45 minutes till the vegetables are nice and soft and beginning to caramelize.

Meanwhile, combine all the stock ingredients in a pot. Add four cups of water and bring to a boil. Let the stock boil while the vegetables cook.

After the soup vegetables have sautéed for about 30-45 minutes, add the garlic, salt and black pepper, and sauté for another minute or two till the garlic is fragrant. Add the cauliflower.

Strain the stock and discard the vegetables. Add the stock to the soup vegetables and bring to a boil. Cook for about an hour.

Puree the soup using an immersion blender. Serve hot, garnished with fennel leaves if desired. 


Come join Soup-a-Palooza at TidyMom and Dine and Dish sponsored by Bush’s BeansHip HostessPillsbury and Westminster Crackers

Fennel Bulb on FoodistaFennel Bulb